

Are you feeling confused by the recent updates about DMARC from Google and Yahoo? You might have heard that DMARC records are crucial for ensuring your email campaigns don’t end up in spam folders in the future.
But what exactly is DMARC, and how can you adapt to this policy change to guarantee the highest deliverability rates? In this blog, we’ll cover everything you need to know about DMARC and how you can ensure your campaigns comply with the latest requirements.
Why Care About DMARC Now?
In October, Google and Yahoo made an announcement stating that bulk email senders need to adhere to DMARC guidelines by January 31st. This move aims to enhance email security and prevent cybercrimes or data breaches.
If you send 5000 emails or more without having a DMARC record in your DNS, your emails could be blocked or directed to spam, which can negatively impact your deliverability.
We highly advise configuring DMARC for all senders; it requires only 15 minutes of your time, but it significantly improves your reputation and deliverability as a sender.
Understanding DMARC, DKIM & SPF Records
Beginning February 1st, major providers and ISPs like Google and Yahoo will conduct DMARC checks prior to delivering emails.
When you consider or read about email deliverability, you’ve probably come across SPF and DKIM records. Before we delve into DMARC, let’s take a brief look at them.
SPF Record
An SPF record specifies the IP address authorized to send emails on behalf of your domain. When you send an email, receiving ISPs and email providers verify if it’s sent from an authorized IP address or server listed in the SPF record.
This record includes all authorized IP addresses linked to your domain.
It also verifies the servers or applications permitted to send emails on your behalf.
Passing SPF authentication guarantees that emails are delivered to the intended inbox.
DKIM Record
The DKIM record serves as an added authentication measure—a distinct record for each domain you possess.
Each email you send is signed with a private key.
The receiving email server uses DKIM records to fetch this key and authenticate your signature.
If an attacker or spammer attempts to alter the email during transmission, DKIM records won’t verify, preventing a potentially harmful email from reaching the recipient.
What’s DMARC, then?
DMARC, or Domain-based Message Authentication, Reporting, and Conformance, is an email authentication protocol designed to verify the identity of your domain.
Think of it as an upgraded version of the SPF and DKIM authentication protocols, connecting your sender domain to how unauthenticated emails are handled if authentication fails.
In essence, DMARC records safeguard and enhance your domain (and your subscribers) against fraudulent emails. When you send an email, DMARC ensures it originates from a legitimate domain owner.
Picture it like an ID badge for emails. Just as an official ID confirms your identity to authorities, DMARC records inform email providers that the emails come from you, not from spammers or imposters.
But how do you prove to email providers that you’re authentic and not an imposter? Simply by adding DMARC records to your domain name’s DNS settings.
With DMARC records in place, the emails you send land in the inbox, bypassing filters set by email providers to block unverified and potentially harmful emails.
Setting Up DMARC Policy for Your Domain
DMARC records are associated with your domain name and indicate to recipients that you are a legitimate and trustworthy sender authorized to send emails. Your DMARC policy relies on the SPF and DKIM configurations you establish in your DNS records.
To establish your DMARC records, follow these steps:
1. Reach out to your hosting provider or DNS record administrator.
2. Ensure that you have already implemented DKIM and SPF records in your DNS settings.
3. Request your hosting provider or administrator to generate a new TXT record in the DNS settings.
4. Include the following string in the newly created TXT record for DMARC:
v=DMARC1; p=none; fo=1; rua=mailto:<enter your email address>; ruf=<enter your email address>
For example, v=DMARC1; p=none; fo=1; rua=mailto:info@sender.net; ruf=mailto:info@sender.net
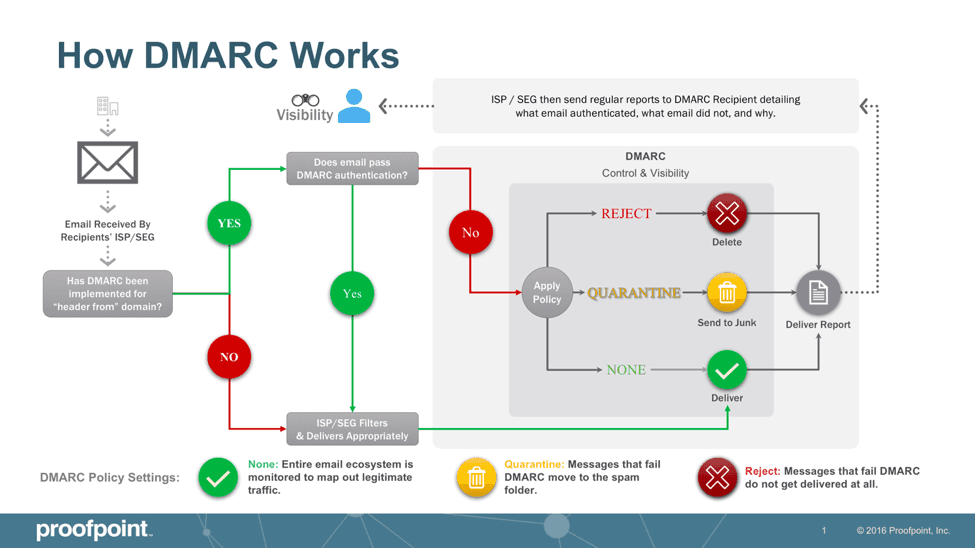
The DMARC policy record outlined above might appear complex, but it essentially communicates to email service providers that you’re compliant (“v=DMARC1”), and specifies your preferences for handling suspicious emails. Let’s break it down into three sections:
Starting with “p=none”: Consider this as your initial step, akin to training wheels. It informs email services, “If my emails fail your checks, it’s okay, no need to worry.” You’ll begin here and monitor the outcomes. Once you understand the results, you’ll be prepared to progress.
Advancing to “p=quarantine”: Before implementing Brand Indicators for Message Identification (BIMI), a method to display your brand logo in emails, it’s advisable to incorporate the quarantine tag into your DMARC record. This is akin to informing email providers, “If my emails appear suspicious, place them in the ‘maybe’ pile (i.e., the junk folder).” However, it’s not an instantaneous switch. You’ll need to adjust the ‘pct’ tag to gradually increase the percentage of emails subjected to this particular scrutiny, starting from just 1% and incrementally rising to 100%. It’s akin to gradually increasing the intensity to avoid any mishaps.
Adopting “p=reject” for full protection: This represents the highest level of security. It directs email services to outright reject emails that fail to meet the standards, returning them to their source before they can reach an inbox. Similar to the quarantine setting, you’ll fine-tune the ‘pct’ tag to progressively increase the proportion of emails subject to scrutiny, beginning cautiously at 1% and advancing to a comprehensive 100%.